Netgear Powerline 1000 Setup
On this page, you will get every information about doing Netgear Powerline 1000 setup in a hassle-free manner. Before we start with the process, let’s first make you understand about the device itself.

What is Netgear Powerline?
A Powerline network is made up of two or more suitable Powerline devices that connect to your electrical power lines and interact with one another. Your router and one of the Powerline devices are linked by an Ethernet wire, enabling the Powerline network and your local area network interconnected. Adding a single Powerline adapter to your home WiFi router, all Powerline devices on the Powerline network can communicate with each other and utilize the router’s Internet connection.
Moving on, let’s make you learn how to form a Powerline network.
Steps to Form a Powerline Network
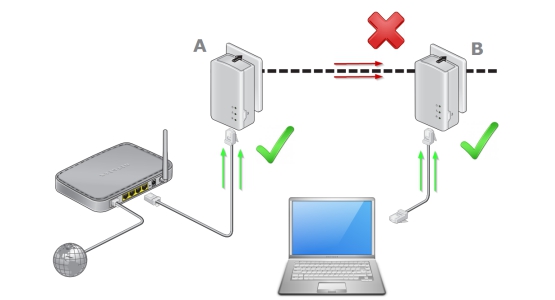
If you want to get successful with the Netgear Powerline 1000 setup, you first need to form a Powerline network for which there is a need for two Powerline devices that are compatible with each other. Once done, follow the steps below:
Make use of a well-working wall socket to plug in your Powerline adapter.
Note:1While placing the Powerline 1000, keep in mind to avoid plugging it in near products that may cause WiFi interference, such as dryers, washers, refrigerators, etc.
Note:2You are advised to do not make use of a power strip or extension cord while plugging your device.
- The first Powerline device should be connected to a wall outlet near your home WiFi router or gateway.
- Once done, connect the Netgear Powerline 1000 to the home router by making use of an Ethernet cable. Make sure the cable you use is not having any cuts.
- Now is the time to plug the second Netgear Powerline 1000 device into a wall socket.
- Turn on the power and let the Pick A Plug LED lit.
That’s all about how you can set up Netgear Powerline 1000 Network.
Just in case, you feel stuck at any step while executing the process and need assistance, contact our technical experts at any hour of the day.
How to Add an Adapter to Powerline Network?
- Turn on the adapter by plugging it into a wall socket.
- Let the devices detect each other and form a network.
- Find and press the button on the Powerline 1000 adapter if a private encryption key has been used by you.
- Once done, press the button on your new adapter.
That’s it! In a while, your new adapter will get added to your Netgear Powerline 1000 network.
Netgear Powerline 1000 Setup – Troubleshooting
Many users face issues while doing the Netgear Powerline 1000 setup. If you are also struggling with the same problem, here’s how to troubleshoot the issue at hand.
There are various tips to be implemented for solving the Netgear Powerline 1000 setup issues. Here they are:
Check all the LEDs – Most users report that they can’t see the LEDs of their devices glowing. If the same is the case with you, check whether the power socket used for plugging the Powerline adapter is working fine. If not, you are advised to plug your Powerline 1000 device into a different wall socket.
Check the Power LED – You need to ensure that you have not used any power strip or extension cord to plug your device. If any of these are being used from your end, rectify your mistake immediately and directly plug the Netgear Powerline adapter into its wall socket and get success with the Netgear Powerline 1000 setup process.
Have a check on the Power LED – If you find that the Power LED on your Netgear Powerline is showing Amber then also you can get success with the Netgear Powerline 1000 setup process. For fixing this, ensure that the Ethernet cable is plugged in and the Powerline adapter is not idle.
Check the Pick A Plug LED – you may also get issues with the process of Netgear Powerline 1000 setup process if the Pick A Plug LED is off or showing red. The same happens when both your Powerline adapters are unable to find each other. For fixing them:
- You need to check whether the Netgear Powerline devices are correctly plugged into their respective wall sockets and getting adequate power.
- Check that both devices are using the same network encryption key.
- Bring your Powerline adapter closer to an outlet where your computer is configured.
- Those who are using private encryption need to ensure that the same encryption key has been used for both devices.
- Try plugging your Netgear Powerline 1000 adapter into a different wall socket. Perhaps, the current one is not working fine.
These all are the ways using which you can fix the Netgear Powerline 1000 setup issues. If even after following the hacks, still you can’t complete the setup of your device, it is suggested that you get in touch with our tech experts for quick help.