Netgear WiFi Extender Setup
A WiFi extender is the best way to boost the existing network range of your router. A Netgear WiFi range extender links to the main router, takes in the input signals and expands the network further. On this page, you will find instructions on Netgear WiFi Extender setup.
How to Do Netgear WiFi Extender Setup?
Two ways to set up a Netgear WiFi extender are by using the WPS buttons and web interface method.
Before you begin with the Netgear WiFi extender setup, collect the information about the router’s WiFi name and password as these will be required during the process. However, if you are using the WPS method, WiFi details are not required. This is WiFi protected setup wherein you connect to the other device without using its WiFi name and password. Let’s proceed with the extender setup process.
Using WPS Button
- Keep the Netgear WiFi extender next to the WiFi router to connect them.
- Plug in the devices to supply power to them.
- Press the WPS button on your router.
- Within the time frame of 2 minutes, press the WPS button on the WiFi extender.
- Repeat steps 3 and 4 if your router supports the second network band as well.
- Wait for some time and let the devices connect.
This way you can carry out WiFi extender setup using the WPS buttons on your networking devices.
There’s one more way that you can use to carry out the Netgear WiFi extender setup apart from the WPS method that we described above. The instructions for the same have been provided below for your reference.
Using mywifiext Web Interface
- The WiFi extender should be placed in the range of the WiFi router.
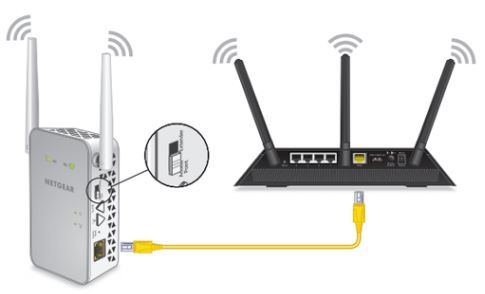
- Plug in the root router before plugging in the extender.
- Connect your computer to the extender’s WiFi.
- The default SSID is Netgear_Ext and the default WiFi password can be found on the label on your extender.
- We suggest running an Ethernet cable from the extender to the computer to ensure a stable internet.
- Use your favorite internet browser to visit mywifiext.net.
- You will be taken to the Setup page.
- Click I Agree to accept the terms and conditions.
- Create an admin login password for your Netgear extender.
- Answer two security questions. The answers will help you retrieve lost password in case that happens.
- Select the router’s WiFi network name and enter its password.
- Assign network name and WiFi password for the 2.4 GHz network.
- Repeat the same with 5 GHz network.
- If you do not change the names, then default network names will be given with suffixes _2GEXT and _5GEXT.
- The default password if not changed will be the same as the main router’s password.
- Save the settings and you’re done completing the New extender setup.
In case you face issues while setting up your extender, then try reducing the distance between the router and the extender.
You can now connect your devices to the extender’s network and check the WiFi network.
FAQs
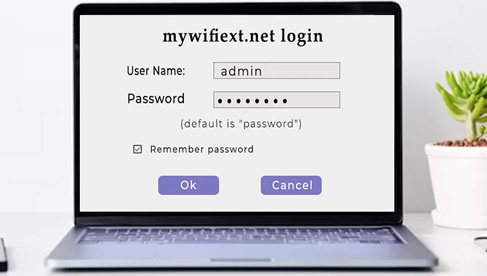
1. What is the default admin username and password for Netgear extender?
The default values are:
Username: admin
Password: password
2. What to do if the WiFi extender setup fails?
- Reboot the devices and retry the setup.
- Use an updated browser and clean its cache.
- Check hardware connections.
- Ensure stable internet and adequate power supply.
- Reset the WiFi extender and retry.
3. Can I use my phone to install my extender?
Yes. You can install the Netgear Nighthawk app to set up your WiFi extender. However, the web interface method is the best way to get the job executed.
4. Where should I place my WiFi extender?
The extender should be placed halfway between the root router and the area with no WiFi. Also, ensure placing the extender away from other electronic devices, home appliances and other interference causing devices.