Netgear EX6130 Setup | AC1200
Netgear EX6130 Setup increases the distance of a WiFi network by boosting the existing WiFi signal and enhancing the overall signal quality over long distances. On this page, you will find the complete procedure of AC1200 EX6130 Setup. Read on.
Netgear WiFi Extender EX6130 Setup
Using Installation Assistant
Forextender EX6130 Setup using the Netgear installation assistant:
- Turn on your AC1200 EX6130 extender.
- Place the extender close to your WiFi router.
- After that, plug the extender into an electrical outlet.
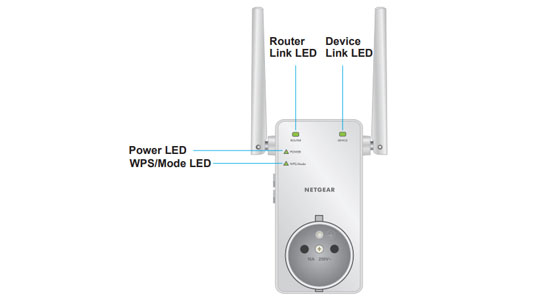
- Wait for the Power LED to light green.
- If the Power LED does not light, press the Power button.
- Connect a computer or mobile device to the extender using a WiFi or Ethernet connection:
- WiFi – On your WiFi-enabled computer or mobile device, open the WiFi connection manager and locate and connect to the extender network. When your WiFi-enabled computer or mobile device is connected to the extender, the Client LED lights solid white.
- Ethernet – Use an Ethernet cable to connect the Ethernet port on the extender to an Ethernet port on your computer.
- Launch a web browser from a computer or mobile device and enter www.mywifiext.net. If mywifiext.net not working on your device, contact our experts for quick help.
- The Netgear installation assistant displays.
- Follow the prompts to connect your extender to the existing WiFi network.
- Move your extender to a new location that is about halfway between your router and the area with a poor WiFi signal.
- If you get no connection or a poor connection, move the extender closer to your router and try again until the Link Status LED lights white.
- After you find the best location for your extender, connect your client devices to the extended WiFi network.
Netgear AC1200 EX6130 Setup
Using WPS Push Button
For Netgear AC1200 EX6130 Setup using WPS:
- Power on the EX6130 extender.
- Place the extender and WiFi router in the same room.
- Once done, plug your extender into an electrical outlet.
- Wait for the Power LED on EX6130 to light green.
- Press the WPS button on the extender.
- Now, press the WPS button on your WiFi router.
- If the EX6130 Link Status LED lights white, the connection between your router and extender is good.
Note: If your router supports the 5 GHz band, your extender attempts to connect to the router’s 5 GHz band the first time you press the WPS button. If your extender did not connect to the router’s 5 GHz band the first time, it may result in a lot of issues during extender setup. To resolve such issues at the earliest, contact support via chat.
- Move your extender to a new location that is about halfway between your router and the area with a poor router WiFi signal.
- Take your WiFi-enabled computer or mobile device to the location with poor WiFi router coverage.
- Connect your WiFi-enabled computer or mobile device to the extended network. Your extender uses the same WiFi network settings as your router for its 2.4 GHz and 5 GHz extended networks.
That’s how you can complete your Netgear EX6130 Setup using WPS button. If you come across any type of technical issue during the AC1200 setup process for EX6130, feel free to contact our experts.
Netgear EX6130 Setup | AC1200
Common Setup Issues
- Mywifiext.com doesn’t open
- Mywifiext.net not working
- Incorrect mywifiext password
- WiFi extender is connected but no internet
- Can’t connect to mywifiext.local
- WiFi extender is not connected to the network
- Netgear genie app doesn’t open
- Issues while accessing 192.168.1.250 IP address
- Can’t find the range extender network name
- The Extender is not working properly
- EX6130 – no internet
- The extender red light causing issues
- Unable to perform the extender reset process
- Internet connected but not working
- Lost configuration CD
- WiFi connectivity issues
- The genie smart setup page continues to appear even after Netgear EX6130 extender setup
- Forgot the extender default password
- Extender’s LED lights are not stable
- Can’t login to the EX6130 extender
- EX6130 drops internet connectivity
- Unable to update the firmware
- Can’t access mywifiext.net after update on EX6130
- MAC address filtering errors
- AC1200 EX6130 not working failed update
- WiFi extender not connecting to internet
Fix all such issues within minimal time by contacting our expert technicians via chat or email.
Netgear EX6130 FastLane Setup
How to Setup EX6130 to Use FastLane
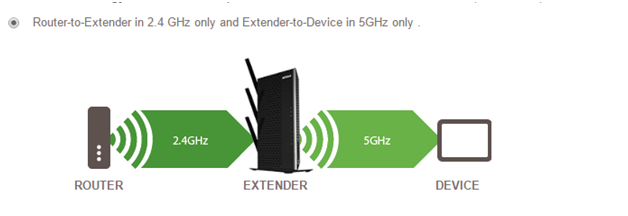
FastLane Technology provides you with maximum WiFi performance. Basically, it offers a high-speed WiFi connection with a dedicated band connecting the WiFi router to your EX6130 extender and a second band connecting the WiFi device and extender. Please follow these steps to configure FastLane Technology on your Extender:
- Connect your client device to the extender.
- After that, open any web browser such as Microsoft Edge, Google Chrome or Internet Explorer.
- Type mywifiext.net in the address bar and press Enter key.
- Enter the username and password when the login window appears.
- On the Netgear Genie page, click on ‘Do More’ and then on ‘FastLane’ option.
- Now, you will get two options: ‘Device-to-extender in 2.4 GHz only and extender-to-router in 5 GHz only’ and ‘Device-to-extender in 5 GHz only and extender-to-router in 2.4 GHz’.
- Select any option you like and click on the Save button.
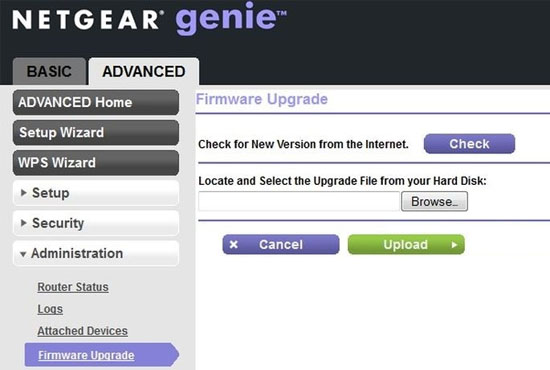
Netgear EX6130 Firmware Update
Upgrade EX6130 AC1200 Firmware After Setup
Does your WiFi extender, all of sudden, start behaving weirdly? Is it not providing the required speed even after a successful EX6130 WiFi range extender setup? If yes, then update firmware on the extender right away. Netgear Extender Firmware is a set of instructions integrated into the hardware device. Talking in a layman’s language, the extender firmware is basically an operating system specifically intended to run on your particular make and model number of the extender. So make sure to have the latest firmware version on your extender. Here’s how to perform Netgear EX6130 firmware update:
- First and foremost, turn on your AC1200 EX6130 WiFi extender.
- Connect a PC, laptop, or mobile device to the extender’s network.
- Once done, open a web browser as per your choice.
- Enter mywifiext.net in the address bar and press enter key.
- Log in to your extender using the username and password.
- Go to the settings menu and click on the Firmware Upgrade option.
- Thereafter, click on the Check button.
- If there is any new firmware version available, click on the yes button for firmware upgrade.
- Now, wait for some time and let the EX6130 firmware update properly.