Netgear EX6150 Setup
Netgear EX6150 Setup is ideal for fulfilling all your WiFi requirements. With dual WiFi bands (2.4GHz and 5GHz), it creates one powerful high-speed internet connection. What’s more, the AC1200 extender provides support for MU-MIMO (Multi-user Multiple-Input Multi-Output) for HD live streaming along with online gaming. This page is your ultimate guide if you are looking for one of the following topics:
- How to Setup AC1200 EX6150 Extender
- Netgear AC1200 Extender Setup
- Netgear EX6150 Setup WPS
- Netgear AC1200 WiFi Range Extender EX6150 Setup
Netgear Extender EX6150 Setup | AC1200
For extender EX6150 Setup using the Netgear installation assistant:
- Turn on your AC1200 EX6150 extender.
- Place the EX6150 extender close to your WiFi router.
- After that, plug the extender into an electrical outlet.
- Wait for the Power LED to light green.
- If the Power LED does not light, press the Power button.
- Connect a computer or mobile device to the AC1200 EX6150 extender using a WiFi or Ethernet connection:
- WiFi – On your WiFi-enabled computer or mobile device, open the WiFi connection manager and locate and connect to the extender network. When your WiFi-enabled computer or mobile device is connected to the extender, the Client LED lights solid white.
- Ethernet – Use an Ethernet cable to connect the Ethernet port on the extender to an Ethernet port on your computer.
- Launch a web browser from a computer or mobile device and enter www.mywifiext.net. If mywifiext.net not working on your device, contact our experts for quick help.
- The Netgear installation assistant displays.
- Follow the prompts to connect your AC1200 EX6150 extender to the existing WiFi network.
- Move your extender to a new location that is about halfway between your router and the area with a poor WiFi signal.
- If you get no connection or a poor connection, move the extender closer to your router and try again until the Link Status LED lights white.
- After you find the best location for your EX6150 AC1200 extender, connect your client devices to the extended WiFi network.
Still can’t complete your Netgear AC1200 EX6150 Setup? Get in touch with our experienced technicians via chat or email.
Netgear EX6150 Setup WPS
Here are the steps for Netgear EX6150 Setup using WPS:
- Power on the AC1200 EX6150 extender.
- Place the extender and WiFi router in the same room.
- Once done, plug your extender into an electrical outlet.
- Wait for the Power LED on EX6150 to light green.
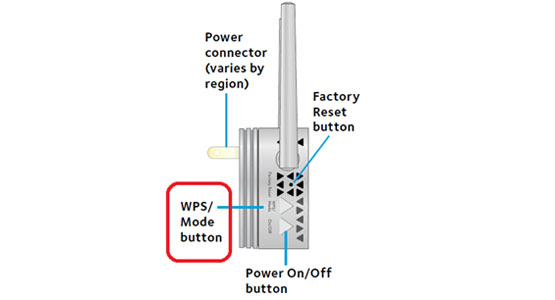
- Press the WPS button on the extender.
- Now, press the WPS button on your WiFi router.
- If the EX6150 Link Status LED lights white, the connection between your router and extender is good.
Note: If your router supports the 5 GHz band, your extender attempts to connect to the router’s 5 GHz band the first time you press the WPS button. If your extender did not connect to the router’s 5 GHz band the first time, it may result in a lot of issues during Netgear EX6150 extender setup.
- Move your extender to a new location that is about halfway between your router and the area with a poor router WiFi signal.
- Take your WiFi-enabled computer or mobile device to the location with poor WiFi router coverage.
- Connect your WiFi-enabled computer or mobile device to the extended network. Your extender uses the same WiFi network settings as your router for its 2.4 GHz and 5 GHz extended networks.
That’s how you can complete your Netgear Ac1200 EX6150 Setup using WPS button.
Netgear EX6150 FastLane Setup
FastLane Technology provides you with maximum WiFi performance. Basically, it offers high-speed WiFi connection with a dedicated band connecting the WiFi router to your EX6150 extender and a second band connecting the WiFi device and extender. Please follow these steps to configure FastLane Technology on your Extender:
- Connect your client device to the extender.
- After that, open any web browser such as Microsoft Edge, Google Chrome or Internet Explorer.
- Type mywifiext.net in the address bar and press Enter key.
- Enter the username and password when the login window appears.
- On the Netgear Genie page, click on ‘Do More’ and then on ‘FastLane’ option.
- Now, you will get two options: ‘Device-to-extender in 2.4 GHz only and extender-to-router in 5 GHz only’ and ‘Device-to-extender in 5 GHz only and extender-to-router in 2.4 GHz’.
- Select any option you like and click on the Save button.
Netgear AC1200 WiFi Range Extender EX6150 Setup
- Lost configuration CD
- WiFi connectivity issues
- The genie smart setup page continues to appear even after Netgear AC1200 WiFi range extender EX6150 setup
- Forgot the extender default password
- Extender’s LED lights are not stable
- Mywifiext.com doesn’t open
- Can’t login to EX6150 extender
- EX6150 drops internet connectivity
- Unable to update the firmware
- Can’t access mywifiext.net after update on EX6150 AC1200
- MAC address filtering errors
- Nighthawk EX6150 not working failed update
- Mywifiext.net not working
- Incorrect mywifiext password
- WiFi extender is connected but no internet
- Can’t connect to mywifiext.local
- WiFi extender is not connected to the network
- Netgear genie app doesn’t open
- Issues while accessing 192.168.1.250 IP address
- Can’t find the range extender network name
- The Extender is not working properly
- Nighthawk EX6150 AC1200 – no internet
- Netgear extender red light causing issues
- Unable to perform the extender reset process
- Internet connected but not working
Netgear Extender EX6150 Setup
Go through the below-mentioned troubleshooting steps to fix Netgear extender EX6150 setup issues:
- Make sure that the AC1200 EX6150 extender is receiving proper power supply from the wall outlet.
- Confirm that the wall plug in which the extender is plugged in is not damaged or short-circuited.
- Access high-speed internet connection on your device.
- Check all the wired connections. Do not use any damaged cable.
- Keep your extender away from walls, room corners, microwave ovens, fish tanks, cordless phones, Bluetooth devices, metal objects, aluminum studs, etc.
- If you are getting issues with mywifiext.net, be certain that you entered the correct URL in the address bar.
- Power-cycle your extender once and try to set it up again.
- Use only the latest version of web browser during mywifiext.net login.
- Update the latest firmware version on your extender.
- Reset the extender to its factory default settings.
None of the aforementioned troubleshooting tips resolve your issues? Don’t panic. Just ask our experts technicians via chat or email to fix your Netgear EX6150 WiFi range extender setup issues.
Netgear EX6150 Manual
When you buy a brand new AC1200 EX6150 extender, you will get a manual in the package. This Netgear EX6150 Manual contains a series of setup steps from starting to end. All you have to do is simply walk through these Netgear EX6150 AC1200 Setup steps and make your extender up and running within minutes. However, understanding these installation instructions is very difficult for regular users. The best way to install your Netgear AC1200 EX6150 WiFi extender with great ease is to chat with our professionals. They will guide you each and every step and set up your extender properly.