Struggling with New Extender Setup?
Are you looking for information about how to setup a WiFi extender? You can put an end to your search here as the entire information that you seek has been provided on this very web page. Apart from the New extender setup methods, you will also get information about troubleshooting tips if you are failing to execute the new extender setup process.
A wireless range extender helps in eliminating WiFi dead zones and improves WiFi coverage in the home. Once you have completed the initial configuration or setup, all you get is wider network coverage and no more WiFi dead spots.If you have purchased a new extender or have done WIFI extender reset, then you need to set it up with the existing home network. Use the instructions given ahead for the same.
New Extender Setup: Essentials
| Netgear Extender | Running on default settings |
| Existing Network | Main gateway or host router that is setup already |
| Ethernet cable/s | Must be in well-working condition |
| Internet connection | Should be stable and fast speed |
| Smart Device | Like computer/laptop or mobile phone |
New WiFi Extender Setup: Initial Preparations
The initial preparations are the same for all methods of New extender setup.
- Ensure placing the extender and router in the same room.
- Turn off the host router for some time and give it some rest to recover its settings.
- Resetting WiFi extender is recommended if it was already in use.
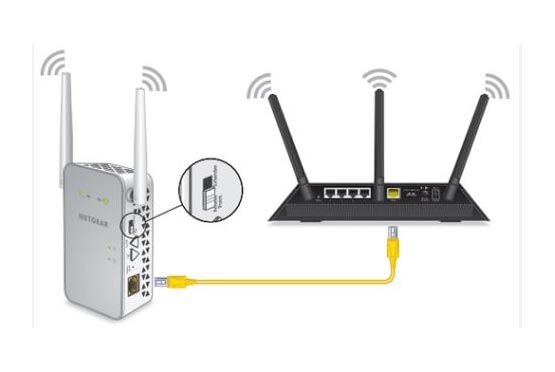
- Establish a connection between the router and the extender using an Ethernet cable. Use the Internet port on the extender and the LAN port on the router.
- Turn on the router first (Ensure keeping it off for at least 5 minutes before turning it on).
- Plug the extender into an active wall socket and turn it on. Let the power LED turn stable.
NOTE: Skip step 2 in case of the WPS Method.
You can now proceed to the actual setup process. We have penned down three ways that you can use to perform a new extender setup. Go through them and choose any one that you find suitable.
After performing the steps given above, follow the instructions given ahead:
How to Setup a WiFi Extender:
WPS Method
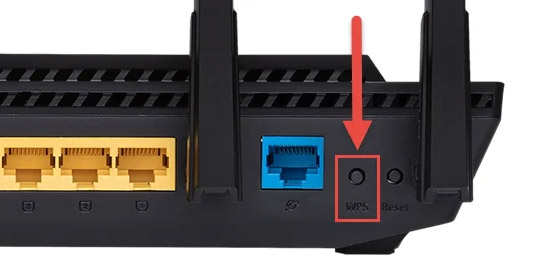
- Press the WPS button on the extender.
- Next, within 2 minutes, press the WPS button on the host router.
- Follow the same process again to set up the 5 GHz network also.
- You have completed the new extender setup using the WPS button.
Using Extender Setup Wizard
- Connect your computer to the extender’s network. In case you have an extra ethernet cable, you can use it to connect a New extender to the computer.
NOTE: The default network name of your extender is Netgear_ext. Either there is no password or the default password is “password”.
- Open an internet browser on the computer.
- Input mywifext.net or 192.168.1.250 in the address field.
- Pressing the Enter key will take you to the New Extender Setup page.
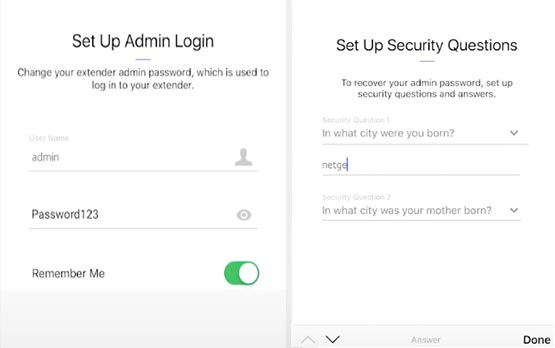
- Agree to the Terms and Conditions and assign a new password for the admin account.
- Answer the security questions. Remember the answers as these will help you recover the admin password if forgotten.
- Select both WiFi networks 2.4GHz and 5 GHz if you want to extend both networks.
- After a few instructions, you will be prompted to select the existing network.
- Enter the existing WiFi password and click Next.
- Assign SSIDs and passwords for both networks.
- After following a few more instructions, WiFi extender setup will be completed.
- You can now connect your computer to the new network.
Via Netgear App
- Connect your smartphone to the extender’s WiFi by connecting it to Netgear_ext SSID.
- Download the Netgear app and launch it.
- The app will begin looking for devices.
- Select WiFi extender from the options.
- Next, select the New Setup option from the Menu.
- You will find some instructions appearing on the screen. Keep on executing them accordingly.
- Select WiFi passwords for both networks i.e. 2.4GHz and 5 GHz when prompted.
- Tap Next.
- You can change the admin password during setup.
- Select and answer the security questions.
- Tap next and the New extender setup is done.
Now you know how to setup a WiFi extender. In case, you are facing issues while executing the setup process by using any of the methods, then you can try the troubleshooting hacks provided in the next section.
WiFi Extender Setup Not Working?
Some most common issues that users often come across while they try to connect a New extender are discussed ahead. The solutions are also provided:
- mywifiext.net or IP address 192.168.1.250 Not Connecting
- New Extender WiFi not Detected
- Unable to connect to extender’s SSID
- 5 GHz network not showing up
- Stuck on New Extender Setup page
- The setup process got interrupted in between
- Not accepting the router’s WiFi password
- Setup done but no internet
These are the topmost reported issues while setting up the wireless range extenders. Let u now tell you about how you can resolve them.
Fixing New Extender Setup Issues
- Perform extender reset to remove previous settings from it.
- Power cycle your router and Netgear extender before the setup process.
- The Ethernet cable should be intact and nowhere near loose.
- Ensure using the right ports on the devices to make the connections. Use the internet port on the extender and LAN 1 port on the router.
- Make sure that your computer or phone is connected to the extender’s network.
- Use an updated browser that is free of cache and junk files.
- Avoid typos while inserting URL or IP address.
- Make sure that the internet connection is stable and power supply to the devices is consistent.
- If 5 GHz is not showing up then there are chances that your extender does not support a 5 GHz network. Or you have not set up a 5 GHz network. Go to settings and enable it.
- You can choose to connect the computer to the extender using an Ethernet cable if WiFi is not getting detected.
Even after trying all these hacks, you could not complete the WiFi extender setup, then perform WiFi Netgear extender reset and restore the factory settings.
How to Reset New Extender?
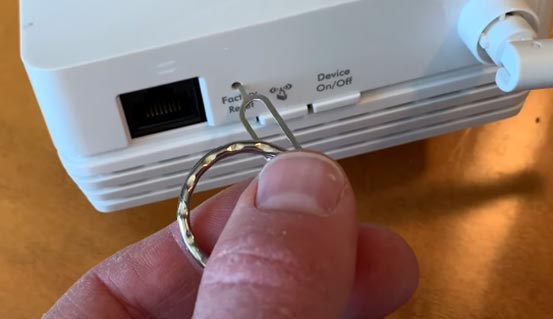
- Disconnect all the devices connected to the extender.
- Also, disconnect the extender and router.
- Using a paper clip, push the Reset hole or press the Reset /Factory Reset on the extender for at least 10 seconds.
- WiFi extender reset is done and the extender is now running on the default values.
Go ahead and perform the New extender setup by keeping into consideration all the points mentioned on this very page.