Netgear EX7700 Setup
On this page, you’ll find detailed information on Netgear extender EX7700. You will learn about its setup process, firmware update and steps to reset the extender to factory settings.
Nighthawk X6 model number Netgear EX7700 is a tri-band WiFi range extender. A WiFi range extender boosts the existing network coverage range and speeds. You should first set up the extender with the existing router. Read ahead for the entire Netgear EX7700 setup process.
How to Set Up Netgear EX7700 WiFi Extender?
The Netgear WiFi extender setup process involves connecting the extender to the existing router and configuring its settings according to your needs. You can complete the extender setup using the WPS button and by using Netgear Installation Assistant.
WPS Connection
This method does not require the network name and password of the existing network to form the connection. Your router should be WPS enabled to connect to the extender using WPS method.
- Keep the Netgear extender EX7700 next to the WiFi router first.
- Connect the power adapter and plug the other end into a socket.
- Toggle the Power on/off button and turn the extender on.
- Press the WPS button on the extender now.
- Within the time frame of 2 minutes, press the WPS button on the WiFi router. The WPS LED turns solid white and the Router Link LED turns on.
- Wait for some time. The Router Link LED should turn solid white when the connection is established.
- Repeat the steps 4 and 5 to connect the second network band.
After the extender is connected to the router, you can shift the extender to a new place. You can now connect to the extender’s network. The network name and WiFi password will be the same as the WiFi router. Only the extension behind the network name will be added.
Connection via Netgear Installation Assistant
- Place the extender and router closer.
- Supply power to both devices by plugging them.
- When the extender completely turns on, connect your computer to its network. Either connect to its WiFi using the default SSID Netgear_EXT or use an Ethernet cable to join the network.
- Load up an internet browser and visit http://www.mywifiext.net.
- The IP address 192.168.1.250 can also be used.
- The Netgear Installation Assistant will come to display.
- The prompts appearing on the screen will guide you through the installation process.
After you have completed the Netgear EX7700 setup, you should unplug the extender from its current location and shift it to a new location where you want to have access to the extended network. Use the Router Link LED to help you choose an ideal location for the extender. It should turn amber or white if the extender is at a good location.
In case you see a red light on Router Link LED then move the extender close to the router. You can now connect to the extender’s network using the newly created WiFi name and password.
Netgear EX7700 Firmware Update
Firmware updates are essential for an extender to perform well. Netgear rolls out updates for its devices on a regular basis. If you create MyNetgear account and register your extender, then you will receive notifications for firmware updates for your extender.
Once an update is available you can install it on your extender. We have provided steps for manual firmware update for EX7700 ahead:
- Go to Netgear Download Center.
- Insert the extender model number EX7700 and download the firmware file.
- Save it on your PC.
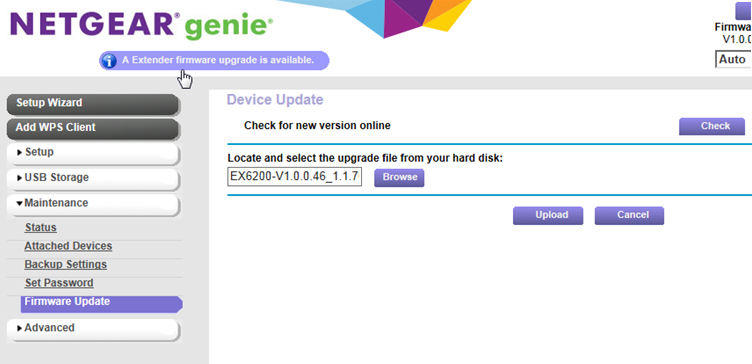
- Now, go to the extender dashboard by logging in. You can log in using mywifiext.net or IP. If using a Mac device use the URL mywifiext.local.
- Click on the Menu icon to display menu.
- Select the Firmware Update option to open the Firmware Update page.
- Click on the Browse button and select the firmware file saved on the PC.
- Next, click Upload to begin the firmware installation process.
The Netgear EX7700 WiFi extender restarts once the firmware is updated.
Why to Reset Netgear EX7700 Extender?
If you fail to set up your WiFi extender or if after the setup process, you are facing any issue, you may need to reset the extender. Some common scenarios when the extender needs to be reset are:
- Forgot extender admin password
- Extender’s performance is very poor and nothing helps
- Your extender needs a new start
- Stuck with setup
- Firmware is corrupted
- Unable to access the extender admin dashboard
These are some common reasons that may put you in a situation to reset your extender to the factory settings.
Steps for Netgear EX7700 WiFi Extender Reset
These are the steps to reset a Netgear WiFi extender:
- Remove any cable that’s connected to the WiFi extender. Let only the power cable remain attached.
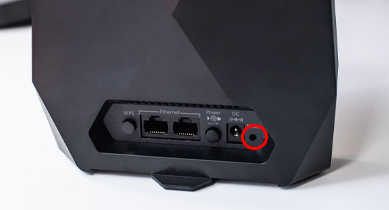
- Find an object with a sharp and pointed end.
- Use this object to hold the Reset button located inside the pinhole.
- Release the button after 10 seconds.
- The extender will reboot after it is reset.
Your extender is now in the same condition it was in before setting it up. You should now carry out the Netgear EX7700 setup once again. Use the WPS method or mywifiext.net Netgear installation assistant to complete the setup.