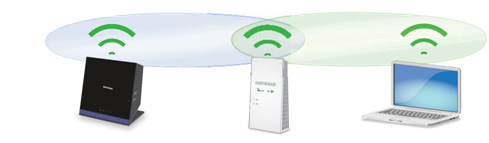
Extend your existing WiFi range with Netgear EX7300 range extender. This device proves extremely helpful in improving the internet coverage and effectively working with your home WiFi easily in order to create a safe, secure, and powerful WiFi/ home networking system. So make your WiFi 10x faster with the Netgear wifi extender setup.
This tutorial provides you with quick, easy, and handy information on how to configure Netgear EX7300 WiFi range extender using Web GUI like a Pro.
If you want to connect with Netgear installation assistant, you have to:
Step-1: Plug in the Netgear EX7300 WiFi range extender and wait for few minutes for the power LED lights to illuminate solid green.
Step-2: Now, connect your device with the range extender using either WiFi or wired connection.
Connect with a Wired Connection
Use a damaged-free and well-maintained Ethernet or USB cable to connect the extender to your computer/ laptop.
Connect with WiFi
Use a damaged-free and well-maintained Ethernet or USB cable to connect the extender to your computer/ laptop.
Connect with Unintruppted WiFi
Open the connection manager on your WiFi-enabled device (computer, laptop, or mobile) and connect to the extender WiFi network.
Step-3: Once done, open a web browser and into the address bar, type mywifiext.net or 192.168.1.250.
Step-4: When mywifiext.net setup page displays, hit on the new extender setup button.
Step-5: Here, you have to complete the fields given on the displayed page and after that, click on next.
Step-6: Also, verify that the extender/ access point switch is set to extender or not. If it is, then hit the continue button and proceed further.
Step-7: Now, select the main router’s WiFi network to extend the internet coverage and click on next.
Step-8: Set the SSID (network name) and passphrase or security key (password) for your WiFi range extender and hit on the next button.
Moreover, if you wish to ask anything or wanna clear any queries, feel free to ask us for Netgear extender support on chat.
Now, connect your computer or laptop to the new extender WiFi network using newly created SSID and password.
Setup Wizard for Netgear Extender Installation
Once you are on the setup wizard, go through the steps mentioned underneath:
- A message will display confirming that the extender is properly connected and ready to use. Here, you have to click on the next.
- When the registration page displays, consider completing the registration fields and hit the finish button in order to complete the setup and installation process.
Note: If you want fast and furious technical support for mywifiext.net login and extender setup, you must register your range extender.
- Unplug your Netgear device and place it anywhere.
- Now, plug your device into a power socket and wait for a couple of seconds for the power LED to turn to solid green.
- Here, you have to use the LED light so that it can help you choose a perfect spot where the connection between extender-to-router is optimal.
- Once done with the placement process, reconnect your computer/ laptop to the extended WiFi network.
Test your extended WiFi range by moving your connected device to the area with the poor connectivity:
- Leave your PC/ laptop in the area with a poor WiFi signal and return to the range extender.
- After that, check the LED light on your WiFi range extender:
In case the LED is amber or solid green, your extended WiFi network will remove all the poor connectivity areas and your network setup is complete successfully. On the other hand, if the LED is red, it means that your extended WiFi network does not cover blind spots.
Move the computer/ laptop closer to the extender. If this process doesn’t work, check the Netgear WiFi range extender manual.