Baffled with the Netgear EX6100 setup process via mywifiext? Worry not! This article is exactly – what you’re looking for.
With the rapid pace of emerging technology, now we have a plethora of options for internet connectivity. Undoubtedly, a wireless router is the “most preferred” among them. This is because it makes you free from the chaos of muddled Ethernet cables.
However, if your house/office acquired an enormous space, just having a router won’t be sufficient for throughout WiFi coverage. Of course, the most effectual solution is to use a WiFi extender conjointly with the router.
Netgear is the name that strikes the mind when it comes to networking hardware. And, this time we bring you the Netgear EX6100 setup using Netgear Genie. The setup for EX6100 is by no means that difficult, however, clear and concise instructions are mandatory. And here, you will get all that you need.
Over to the setup process now…
Note: Prior to initiating the setup process, you must complete the installation part. Installation includes connecting the extender to the power supply and pairing it with the WiFi network.
Steps for Setting up Netgear EX6100 using Netgear Genie
The setup process with mywifiext (Netgear Genie) is ideal when the router doesn’t have the WPS button. This process is regarded as the “Manual” setup because users manually need to login to the extender setup portal. Thereafter, you have to execute the respective on-screen instructions. Here’s over to step by step description:
-
- Push the side switch to the “Extender” mode.
- Now, connect the extender to the power outlet near to the router.
- Press the power ON/OFF button and let the power light glow solid green.
- Thereafter, connect any Computer/Laptop or Tablet to the extender’s wireless network.
**(You will notice two available networks: EX6100_2GEXT and EX6100_5GEXT.) - If the Extender’s light link LED gets turned on, your device is successfully connected to the extender’s network.
- Its time now to open any of the installed web browsers.
- Navigate to Mywifiext.net. This web address will open the Netgear Genie installation wizard.
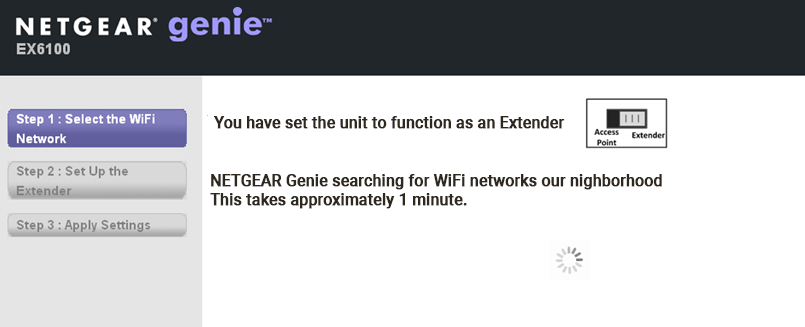
- Soon after that, a list of the available networks will appear on your screen.
- Choose the network name (SSID) that belongs to 2.4 GHz band and tap on “continue”.
**(If your router supports the 5GHz bandwidth, then you can choose to “skip”.) - Put the passphrase of the selected network in the prompted box.
- Hit the “continue” button. Execute the same steps for the 5GHz band network.
**(For users who do not have an active 5GHz network, they can choose to “skip”.) - Tell the wizard that whether the selected network is a public or private network.
- If it’s your home network, tap on “private network”.
- Setup the security details and mode of the wireless extender and tap on “continue”.
- Let the Genie apply all the settings.
- Lastly, click on “Finish the setup” and connect to the extended WiFi.
On the Mywifiext.net Setup Success, a congratulation message will appear on your screen. In the alternate scenario, power- cycle the extender and repeat the setup steps.
Still, struggling with Netgear EX6100 Setup?
Contact our experienced technicians now.