In this blog, you will find instructions for Netgear WAX204 setup, login, firmware update and reset process. WAX204 is designed to operate as an access point, however, it can also function as a router. The default mode is Router mode. If you want to set it up as an access point, select the mode AP. Read on to know more about it.
Determine the Mode on WAX204
You should first determine the mode that you want your device to function on. The table below is going to help you.
| User has | User Expectations | Operation Mode to Select |
|---|---|---|
| Broadband, cable or DSL networking device with WiFi, router | To add WiFi 6 network | Access Point/AP |
| Broadband, cable or DSL networking device with no WiFi, modem | To add WiFi 6 and wired network | Router |
| Ethernet wall outlet with Internet | To setup WiFi 6 hotspot for existing network | Access Point/AP |
| Ethernet wall outlet with Internet | To set up a separate private WiFi 6 network | Router |
By now, you should have determined the mode that you wish to select on WAX204. The upcoming sections are going to highlight the Netgear access point setup steps in both modes.
1. Netgear WAX204 Setup in AP Mode
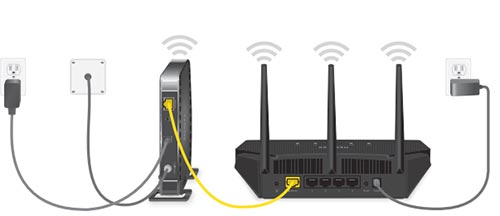
Fig 1: WAX204 connected to broadband, cable or DSL router
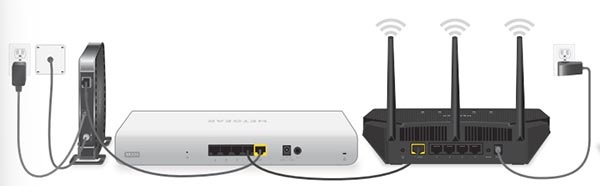
Fig 2: WAX204 connected to existing router
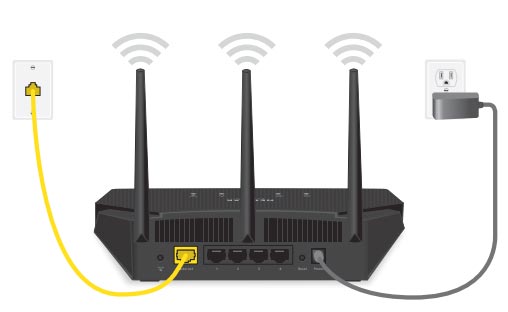
Fig 3: WAX204 connected to Ethernet wall outlet with internet
Make the Connection:
- Begin by placing the access point close to the broadband, cable or DSL router/existing router/Ethernet Wall outlet.
- With the help of an Ethernet cable, link the yellow internet port of WAX204 to the LAN port of the router/Ethernet wall outlet.
- Plug in the access point. Let the Power LED turn on solid amber after lighting solid red for 5 seconds.
- Wait for about 2 minutes and let the devices connect to each other.
- Wait till the WiFi LED and Power LED turn solid green.
Log in to Access Point:
- You need to log in to AP now. You have two options here:
- WiFi Connection: Connect your PC or mobile phone to the access point’s SSID. The default SSID and WiFi password are available on its label.
- Ethernet Connection: Connect the LAN port of your PC to the LAN port of the access point.
- After the network connection, run an internet browser.
- Type routerlogin.net in the address bar and press the Enter key.
- You will have the Setup Wizard open in front of you.
- Follow the prompts.
- Set an admin password: Assign an admin password for Netgear WAX204 that will help you log in to it for future use. Answer two security questions that will help you retrieve the lost password.
- Set WiFi Name and Password: Create a new network name (SSID) and WiFi password during the setup.
- Update Firmware: If an update is available, then follow the prompts to upgrade your access point.
- As soon as you are done executing all the above steps and finish the Setup Wizard process, your access point will reboot.
Change Mode on WAX204:
- Log in to your Access point using the newly assigned admin password.
- Navigate to Advanced > Advanced Setup > Router /AP / Bridge Mode.
- Select AP Mode.
- Select the option “Get dynamically from existing access point/router”
- Click Apply.
You have successfully set up Netgear WAX204 in AP mode. You can further configure and customize its settings.
Netgear WAX204 Setup in Router Mode
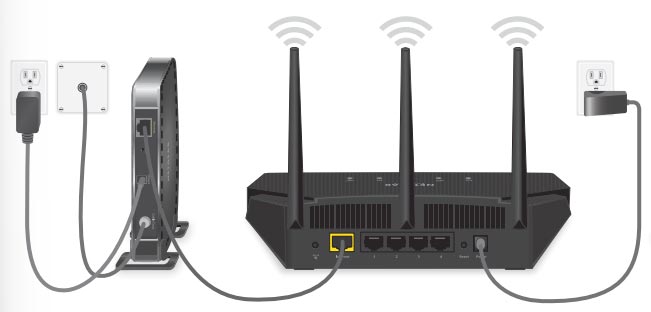
Fig 4: WAX204 connected to modem
Fig 5: WAX204 connected to Ethernet Wall outlet
Make the Connection
- Initiate the process by keeping the Access point close to the modem or Ethernet Wall outlet.
- Turn off the modem for some time.
- With the assistance of an Ethernet cable join the LAN and Internet ports of the modem/Ethernet wall outlet and access point respectively.
- Supply power to the modem now.
- Switch on the WAX204 access point as well.
- The devices will make the connection.
- The Power LED and WiFi LED turn solid green when the connection is established.
The rest steps will be the same as in the previous section.
The default mode on your WAX204 access point is Router mode. Hence you need not change the mode as done in the previous method.
How to Update WAX204 Firmware?
You should keep the firmware on your access point up-to-date. The steps given below will help you update it:
- Log in to your Access point.
- Go to Advanced > Administration > Firmware Update.
- Click on the Check button on the Firmware Update page.
- If an update is available, you will be asked if you wish to update your device.
- Confirm by clicking on the Yes button.
- Let the AP get updated. Wait until you see the message of confirmation.
You can also manually update your Netgear access point by first downloading the firmware file on your computer and then installing it on the AP. We suggest registering your product by creating MyNetgear account. You will receive firmware update and other notifications related to your Netgear product.
In the End
Here we conclude our helpful informative post about the Netgear WAX204 setup. We also helped you with firmware update instructions. Let us tell you that if you want to give your access point a new start, or if you are not happy with its performance or you failed to set it up, then you should reset it to the default settings.
To Reset WAX204, follow these steps:
- The Reset button is located at the back of the AP.
- With a pointed object, press the recessed button.
- Hold it for about 5 seconds or till you see the Power LED blinking amber and then release it.
After you have reset your access point, you need to set it up once again using the instructions discussed in this post.