A Netgear WiFi range extender can be used as access point for Piso WiFi. You need to connect the devices first. You can do this either on a computer or on your mobile phone. The process is very simple and can be done without any external technical assistance. This very guide will help you configure your Netgear WiFi extender as AP so that you can use Piso WiFi vending machine that can be set up using Piso WiFi portal login. Go on reading further to know the entire process.
Netgear Extender as AP for Piso WiFi: Installation Steps
Use the steps given below and set up your Netgear WiFi extender as AP or access point:
1st Step: Make the Connections
Before you begin with the AP setup of your Netgear range extender, make sure that it is a connected with the main router properly. Whether you have used a LAN cable to connect them or made a wireless connection, see to it that connection is well intact. Make certain that the LAN cable runs from the LAN port of the router to the Internet Port on the extender. In the event of making a wireless connection, see to it that the extender sits within the range of the router.
Once you have verified the connection, go to the next step.
2nd Step: Power on the Devices
First of all, power on the devices. You need to switch on the main router first. After that plug in the Netgear range extender and power it on using the Power button on it. Let the Power LED on it stabilize. Check the power socket if the Power light does not lit. Also, power up Piso WiFi device.
3rd Step: Connect to Extender’s Network
You now need to connect your computer, laptop or mobile phone to the WiFi extender’s network. Go to the WiFi options and select Netgear extender’s SSID Netgear_ext from the list and use the WiFi password to connect to it. You can also use a LAN cable to connect to the extender’s network.
4th Step: Log in to Netgear Extender
Run an updated internet browser on your computer, laptop or mobile phone now. Use mywifiext.net or IP 192.168.1.250 and go to the login page of the extender. Use the login username and password to log in to the extender. Ensure using the correct admin details to get through the login process.
5th Step: Change WiFi Settings
There are three changes in the settings of the extender that you need to make:
Firstly, go to the wireless settings of the extender. Select connection type as Dynamic IP.
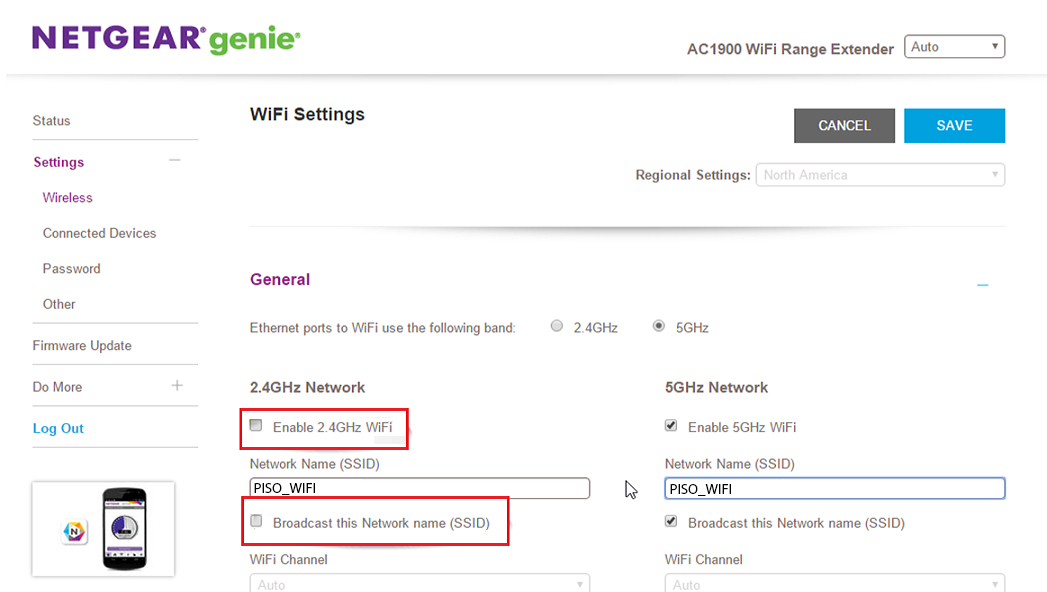
Secondly, in the Network Name (SSID), select LPB Piso WiFi SSID. Enter its WiFi password and save the settings. Do the same for both network bands, 2.4 GHz and 5 GHz. Save the settings once you are done making the changes.
Thirdly, select the operation type on your Netgear extender as AP mode as it will now be used an access point for Piso WiFi.
6th Step: Connect to LPB Piso WiFi
Now go back to the WiFi settings of the PC or phone and change the WiFi connection. Select Piso WiFi network from the list and connect to it. Once connected, go to the next step.
7th Step: Disable DHCP Server
Now get back to the extender’s settings on your connected device. Go to Advanced settings and select Network. Here disable DHCP server. Save the settings and you are done.
What’s Next?
You are done making changes in the settings of the Netgear extender. It is now time you connect the devices.
Connect Extender & Piso WiFi
Now, disconnect your Netgear extender from the router. You should next use the LAN connection and connect your Netgear WiFi extender to the Piso WiFi. Make sure you are using the LAN port on the extender and Internet port on Piso WiFi device. That’s it! Your Netgear extender is now ready to be used as access point for Piso WiFi.
The Final Note
This is how you can set up your Netgear WiFi extender as access point for LPB Piso WiFi. Make sure that you make the changes in the settings of the extender very carefully. The process is pretty simple if you are little more vigilant. Now, you can begin using your Piso WiFi vending machine using the Netgear extender’s WiFi network.