Netgear WAX214 dual band PoE is a standalone indoor access point. This is ideal to provide a high-performance internet connection to small offices and homes. Want to perform Netgear EAX214 setup in your home? Reading this blog post will be helpful. Here you will find clear and step-by-step instructions to install the access point. Keep reading ahead.
Netgear WAX214 Setup Instructions
1st Step: Connect Netgear WAX214
Begin by powering up the access point. This can be done by connecting the access point to the PoE switch. Find the LAN/PoE port on the access point first. Connect it to a PoE switch that supplies 802.3af power supply and 1 Gbps Ethernet speed.
2nd Step: Connect to Management WiFi Network
Once WAX214 is booted up, its management network SSID becomes active. You ought to connect to its network to proceed further. So, switch on your laptop or computer. Join the management SSID on the PC now.
By any chance the SSID is not available, press the Reset button on it for about 15 to 20 seconds. If the device stays inactive for about 15 minutes the SSID turns off, resetting the device will be helpful in that scenario.
The default SSID and password can be found on the label on the device. Use these details to connect to WAX214’s network.
3rd Step: Log in to WAX210 User Interface
After connecting to the right SSID, run an internet browser. Type aplogin.net in the URL field. You can also use the default IP address 192.168.0.100 instead. Pressing the Enter key will display the login page for the WAX214 setup.
4th Step: Assign Credentials and Log In Again
Now, assign and set a new local device password that you will use to log in to your device. Also, set up a new SSID and WiFi passphrase. Accept the Terms & Conditions by Netgear. Once done, click on the Apply button and save the settings.
Now go back and insert the login URL or IP and log in again using the updated password. You can now see the configuration settings of your Netgear WAX214.
5th Step: Update Netgear WAX214 Firmware
Although the access point is ready to be used now, we recommend updating its firmware to the latest version. To update the Netgear WAX214 firmware, you need to join its network and log in. Use the newly assigned SSID and passphrase to join the AP’s network. After connecting, use the following steps:
- Use the official Netgear website to check the firmware update for the Netgear AP WAX214 model number.
- Download the firmware file on the computer.
- Next, run the browser and insert the login IP or web URL in the address field.
- Hit Enter and use the login credentials to log in.
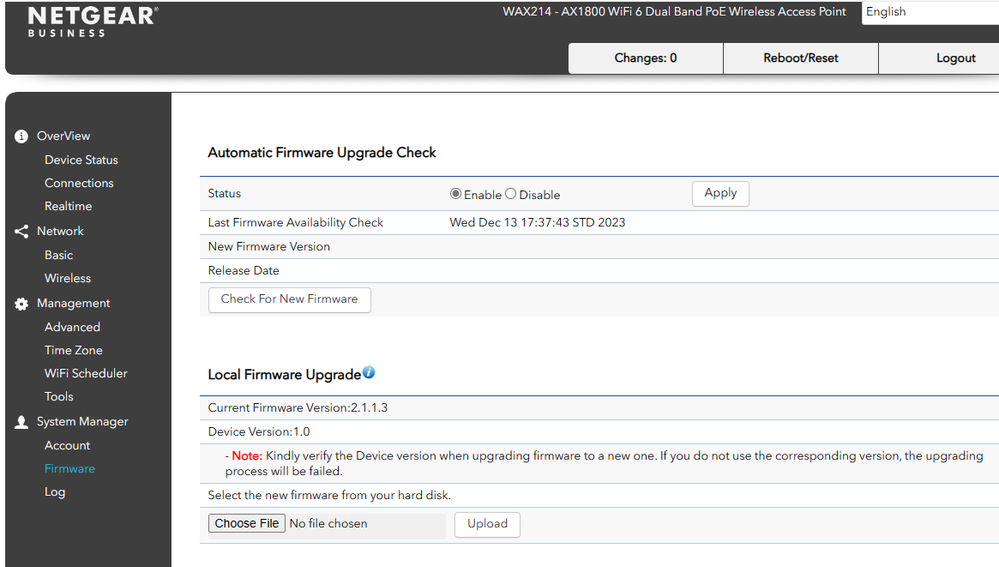
- You can check the current firmware on your Access Point in the Firmware option under System Manager.
- On the admin dashboard, go to the Firmware Upgrade section.
- Now, click on Choose File button and browse the firmware file that you saved on your PC.
- Choose the firmware file and click on Upload button. The firmware will begin updating on the access point now. Ensure not to interrupt the process by any means.
- As soon as the firmware updates on the access point, the login page will display.
This completes the Netgear WAX214 setup. It is now ready to be used. You can mount your access point on a solid wall or ceiling. You can also mount it to a ceiling with 23.8 mm T-bar. Another option is to install it freestanding on a flat surface. You’re provided with the screws and mounting brackets. Use these to mount the access point anywhere you want.
We also recommend registering the AP to the MyNetgear account. This will help you get Netgear support and receive security and firmware updates.
Summing Up
This helpful guide helps you to complete the Netgear WAX214 setup using the step by step instructions. Begin by placing the access point and powering it up. After that, join the AP’s network on your PC. Do the login and carry out the setup instructions on the screen. We have also provided you with information on how to carry out Netgear WAX213 firmware update to the latest version.
This simple guide is sufficient to help you complete the setup. With this hope that you’ve installed the AP in the home, we are putting a full stop to our post.